动漫角色扮演动作游戏,灵感来自... 更多信息
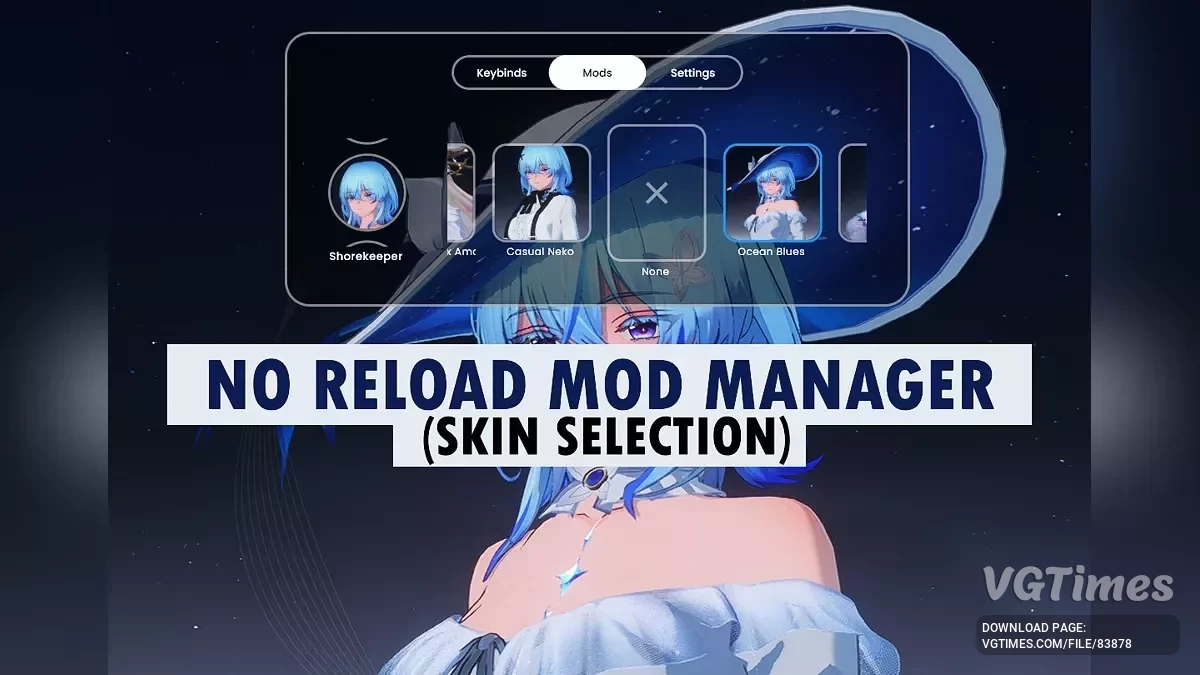
无重载模组管理器(皮肤选择)


-
下载 (54.09 MB)2025年5月27日, 13:12no-reload-mod-manager-skin-selection_1748340758_505171.rar
概述 / 为什么选择这个模组管理器.
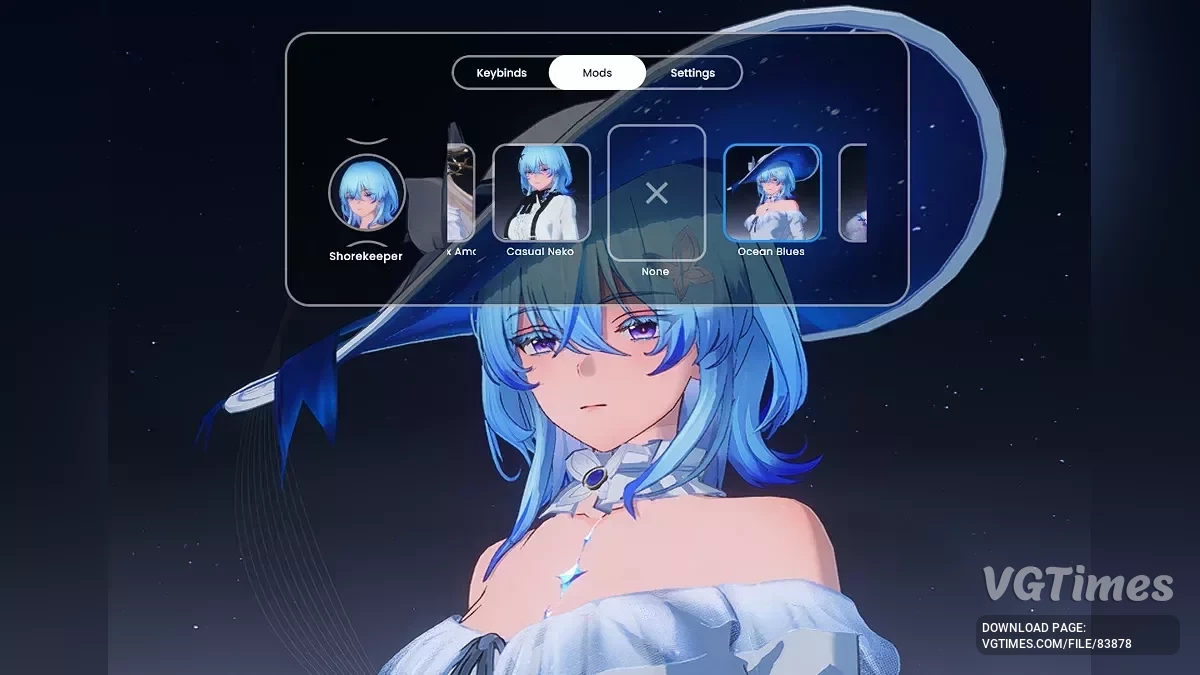
无重载模组管理器是一个旨在简化模组管理的工具。使用此工具,您可以:
- 直接选择皮肤/模组,无需重载游戏(F10)。
- 为您的模组提供图像/图标。
- 为特定角色分组模组。
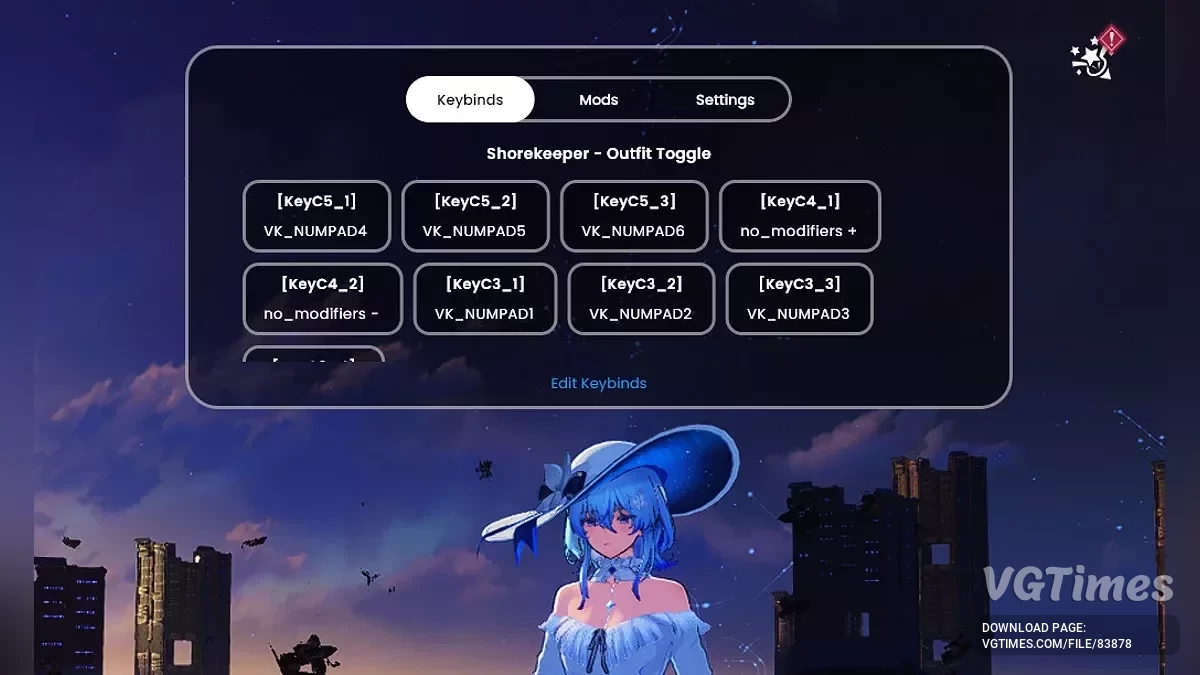
- 查看和编辑模组快捷键。
此工具支持 鼠标、 键盘 和 游戏手柄(仅限XInput) 输入以进行模组选择/导航。
我知道我们中的一些人喜欢使用游戏手柄/控制器。
功能:
- 模组选择: 随时选择和应用模组。
- 无重载:此功能修改您的.ini模组文件,以便可以选择模组,而无需重载。
- 快捷键编辑器: 方便地修改模组快捷键。
- 自动游戏检测: 按下切换窗口快捷键将打开对应目标游戏的窗口。
- 支持键盘、鼠标、游戏手柄(仅限XInput)
指南:
如何安装:
- 下载 安装程序设置文件。
- 双击 安装程序exe文件并按常规安装。
- 打开 已安装的程序。
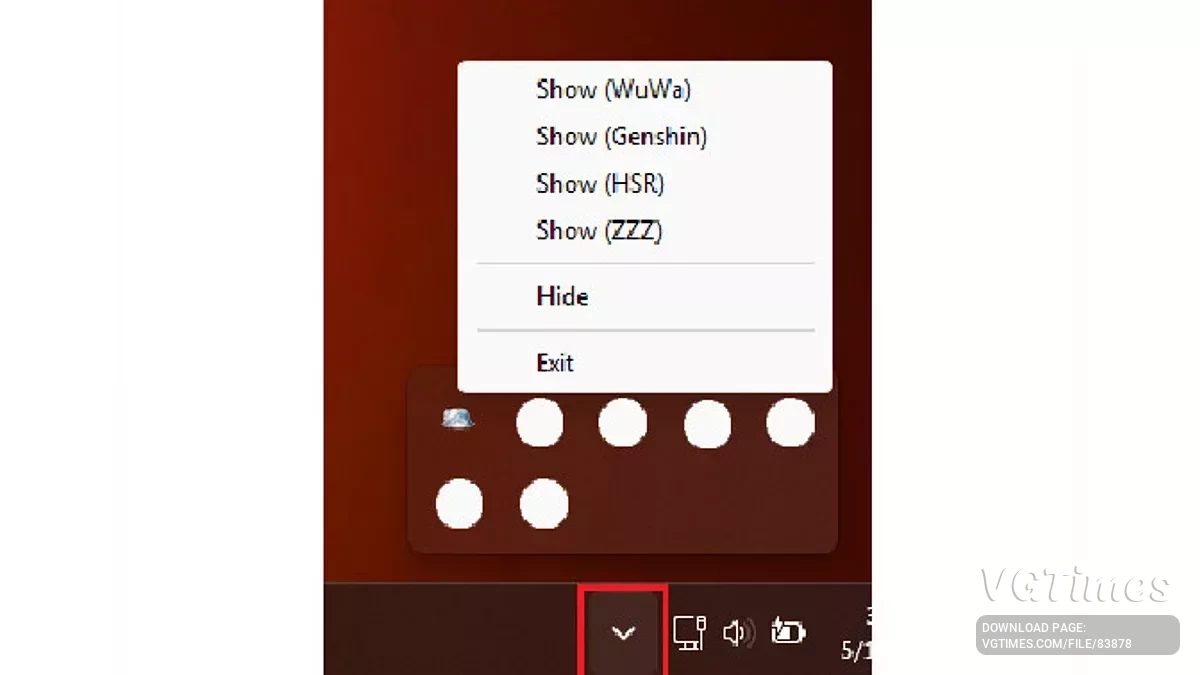
- 如果程序正在运行,您可以在 系统托盘 (右下角)看到其图标。
- 单击 系统托盘上的图标,选择您的目标游戏。它将打开模组管理器窗口。
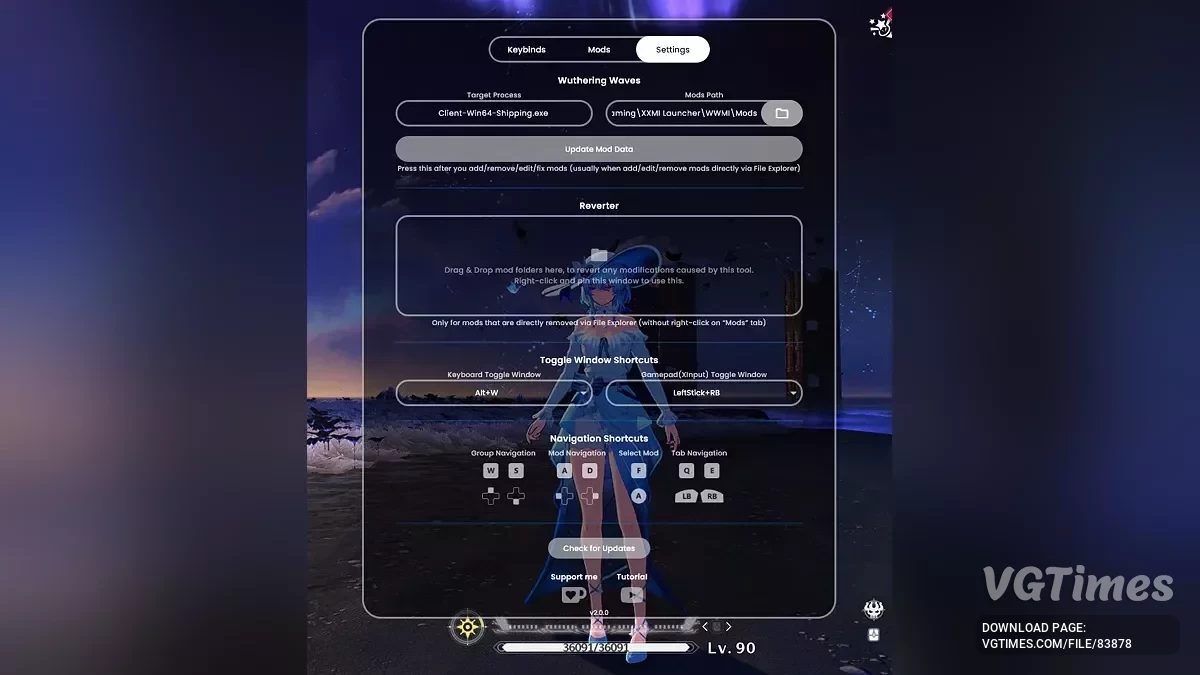
- 转到 设置 选项卡,确保 模组路径 对于您指定的游戏是正确的。
- 单击更新模组数据
- 完成!您现在可以组织模组、编辑快捷键等。
如何在不进入系统托盘的情况下打开模组管理器窗口:
- 确保您当前的窗口是目标游戏的窗口。
- 按 Alt+W(默认),这将显示/隐藏模组管理器窗口。
- 如果没有反应,请确保它正在运行并在系统托盘上,并请检查 设置 选项卡,确保 目标进程 是正确的。确保 切换窗口快捷键 是正确的。
如何在使用XXMI打开游戏时自动运行(可选):
- 确保它已安装。
- 使用Windows搜索查找 无重载模组管理器 。
- 您应该看到选项 打开文件位置。单击它。
- 右键单击它,选择 复制路径。
- 打开您的XXMI,在目标游戏上,转到XXMI设置,转到高级,勾选运行后启动/运行前启动(随您选择)。
- 将复制的路径粘贴到那里。
如何添加组/模组:
- 确保您的 模组路径 是有效的。
- 在 模组 选项卡上右键单击任意位置,查找 添加组。
- 右键单击模组选择区域,选择 添加模组。
- 现在您可以拖放模组文件夹。1个文件夹=1个模组。
- 按F10重新加载 如果没有自动重新加载。
- 每组最大模组数量为 40个模组。最大组数为 48组。
如何通过文件资源管理器直接添加组/模组:
- 转到您的 _MANAGED_ 文件夹,在您的 模组 文件夹中。
- 在其中,您可以创建新文件夹,这是组文件夹。命名格式为 group_x ,其中x为1-48。确保命名格式完全正确且为小写。 示例:group_1、group_14、group_48。
- 转到组文件夹,您可以在此粘贴您的模组文件夹。1个文件夹=1个模组。
- 打开模组管理器窗口。按 更新模组数据。此步骤 非常重要。
- 按F10重新加载 如果没有自动重新加载。
如何通过文件资源管理器直接删除组/模组:
- 确保您的 模组路径 是有效的。
- 在 模组 选项卡上右键单击组/模组并选择删除组/模组。
- 这将把您的模组/组文件夹移动到 DISABLED_MANAGED_REMOVED 在您的 模组 文件夹中。
- 它将自动恢复对模组的.ini文件的任何更改。这意味着 您在这些模组被管理时所做的任何更改都将被删除/恢复。
- 按F10重新加载 如果没有自动重新加载。
如何通过文件资源管理器直接删除组/模组:
- 转到您的 _MANAGED_ 文件夹,在您的 模组 文件夹中。
- 在其中,您可以删除/移动组或模组文件夹。
- 如果您移动了它而不是删除它,请打开模组管理器窗口并转到 设置 选项卡。将文件夹拖放到 恢复器。此步骤 非常重要。
- 打开模组管理器窗口。按 更新模组数据。此步骤 非常重要。
总结:
像往常一样安装,打开,从托盘访问或在游戏中按Alt+W。皮肤选择或模组选择。
它修改您的.ini模组文件,以便可以在不重载的情况下进行管理。
为了更改所选皮肤,它会向WWMI(和其他)发送按键模拟。"background_keypress.ini"使您的WWMI(和其他)即使在游戏未聚焦时也能接收按键。它不会将按键发送到游戏,仅发送给WWMI(和其他)。
Overview / Why this Mod Manager.
No Reload Mod Manager is a tool designed to make managing mods easier. With this tool, you can:
- Select skins/mods directly without needing to reload the game (F10).
- Give images/icons to your mods.
- Group your mods for a specific character.
- View and edit mod keybindings.
This tool supports mouse, keyboard, and gamepad (XInput only) inputs for mod selections/navigation.
I know some of us like to play with gamepad/controller.
Features:
- Mod Selection: Choose and apply mods on the fly.
- No Reload: This modify your .ini mod files, so that it can select mod, without reload.
- Keybinding Editor: Modify mod keybindings conveniently.
- Automatic Game Detection: Pressing toggle window shortcut key will open window to corresponding target game.
- Support keyboard, mouse, gamepad (XInput only)
Guide:
How To Install:
- Download the installer setup file.
- Double-click the installer exe file and install as usual.
- Open the installed program.
- If the program running, you can see its icon on System Tray (bottom-right corner).
- Click the icon on system tray, select your target game. It will open the Mod Manager window.
- Go to Settings tab, make sure Mods Path is correct for your specified game.
- Click Update Mod Data
- Done! You can now organize mods, edit keybindings, and so on.
How To Open Mod Manager Window Without Going To System Tray:
- Make sure your current window is your target game's window.
- Press Alt+W(default), this will show/hide mod manager window.
- If it does nothing, make sure it's running & on system tray and please check on Settings tab, make sure Target Process is correct. Make sure Toggle Window Shortcuts is correct.
How To Automatically Run When Opening Game With XXMI (Optional):
- Make sure it's already installed.
- Search No Reload Mod Manager with Windows Search.
- You should see option to Open File Location. Click it.
- Right-click on it, select Copy as path.
- Open your XXMI, on your target game, go to XXMI Setting, Go to Advanced, Tick Run-Post Launch/Run Pre-Launch (up to you, choose one).
- Paste the copied path there.
How To Add Group/Mod:
- Make sure your Mods Path is valid.
- While on Mods tab right click anywhere and look for Add group.
- Right-click on mods selection area and select Add mod.
- Now you can drag & drop mod folders. 1 folder = 1 mod.
- Press F10 to reload if not automatically reloaded.
- Max mods per group is 40 mods. Max group is 48 groups.
How To Add Group/Mod directly via File Explorer:
- Go to your _MANAGED_ folder on your Mods folder.
- In there, you can create new folder, it is group folder. The naming format is group_x where x is 1-48. Make sure the naming format is exactly correct and in lower-case. Example: group_1, group_14, group_48.
- Go to group folder, you can paste your mods folder here. 1 folder = 1 mod.
- Open Mod Manager Window. Press Update Mod Data. This step is very important.
- Press F10 to reload if not automatically reloaded.
How To Remove Group/Mod:
- Make sure your Mods Path is valid.
- While on Mods tab right click on group/mod and select remove group/mod.
- This will move your mod/group folder to DISABLED_MANAGED_REMOVED on your Mods folder.
- It will automatically revert any changes to mod's .ini files. Which means any changes you made while these mods were managed will all be removed/reverted.
- Press F10 to reload if not automatically reloaded.
How To Remove Group/Mod directly via File Explorer:
- Go to your _MANAGED_ folder on your Mods folder.
- In there, you can delete/move group or mod folder.
- In case you moved it and not delete it, open Mod Manager Window and go to Settings tab. Drag and drop the folders to the Reverter. This step is very important.
- Open Mod Manager Window. Press Update Mod Data. This step is very important.
TLDR:
Install it as usual, open it, Access it from your Tray or Alt+W while on a game. Skin Selection or Mod Selection.
It modifies your .ini mod files so that it can be managed without reload.
In order to change selected skin, it sends keypresses simulation to WWMI (and other). "background_keypress.ini" makes your WWMI (and other) receive keypress even when the game is not focused. It does not send keypress to the game, only to WWMI (and other).
有用的链接: